Here is a detailed guide on how to accept a connection request from an Onboarding Company as an Individual on the valid8Me mobile app.
If you don't have the valid8Me App, you can download it from the App Store or Google Play Store. Alternatively, you can also use the valid8Me Web App by visiting https://customer.valid8me.com/#/login
If an Onboarding Company is looking to connect with you, you will receive an email, as seen here:

Scroll down to select the app that best fits your device and follow the steps to install it.

After choosing and installing the appropriate app on your phone, you can sign in or register for a new account by simply clicking on the "Sign Up" link found at the bottom of the screen.

Before proceeding, please take a moment to review the end user terms and conditions. If you agree to them, simply check the box and click on "Get Started" to begin.

Enter your email address and create a secure password. Confirm your password by typing it again, then proceed by tapping on the "Next" button.

To verify your email address, simply enter the code that was sent to the email address you provided in the previous step.

Once your account has been successfully created, you will receive a notification confirming the completion of the process.

At this stage, it becomes evident that the Onboarding Company requires users to upload a Proof of Address and a Photo ID. Additionally, certain Security Checks, such as Liveness Detection, must be completed as part of the verification process.

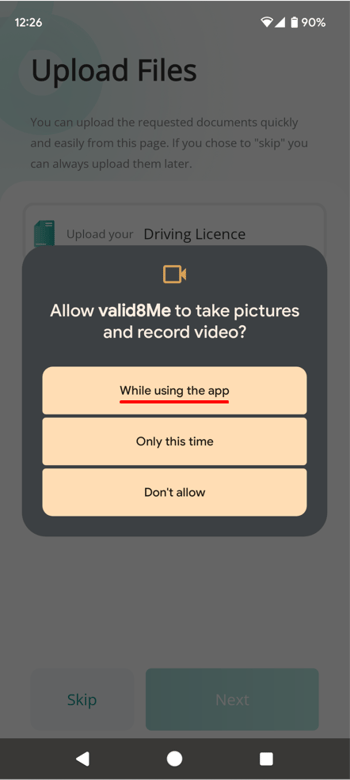
To allow valid8Me to take photos and videos, the first time you use the app, please give permission for accessing your camera and recording videos while using the app. Allowing access to your camera and video recording is essential for conducting the liveness detection test and capturing your profile photo.

Select the document you wish to upload.

To submit the required Proof of ID and Address, you have the option to either choose documents that you have saved previously or take a photo of them using the app.

If the document you wish to upload is already on your device, simply select Upload/Retrieve. If not, you can choose to "Take a photo" using the app. In this scenario, since the document is already on your phone, you can select Upload/Retrieve and then tap on the document.

If you have additional documents to upload, you can easily add them at the bottom of the screen. If you are finished uploading documents, simply select the chosen document and upload it using the Upload button located at the top right corner.

Once you are happy with the upload, you can confirm it by tapping on the "Confirm" button.

You will receive a notification confirming that your document has been successfully uploaded. To continue, simply tap on the "View Documents" option.

On the next screen, you will see a checkmark confirming that the Photo ID document has been successfully uploaded. Additionally, you will be prompted to upload the Proof of Address as the next document.

Once you have uploaded your Proof of Address, you will be prompted to enter the date of issue for the document.

Once you have uploaded your Photo ID and Proof of Address, the next step is to complete the Customer Security Checks. Start by selecting "Pending" for each check, beginning with the "Liveness Detection".

After tapping Next, you will be directed to the next screen. Tap on "Let's Go" to begin the Liveness Detection test.

Follow the instructions displayed on the screen to successfully complete the test.

If you are experiencing issues with liveness detection, try the following tips to improve the process:
- Clean the screen of your phone where the camera lens is located
- Ensure you are in a well-lit area
- Connect to WIFI instead of using mobile data
Following these tips can help enhance the accuracy of the liveness detection test.
Once the liveness detection is successfully completed, there are two remaining Security Checks that need to be finalized. To continue, simply tap on one of the pending items.

Select "OKAY" to authorize sharing your location.

Here are the choices available for you to select.

After sharing your device's location tap on take photo

Follow the on-screen prompts and tap the "Take Photo" button when you are prepared.

Once you have successfully completed the Customer Security Checks, you can simply tap on the "Consent" button to share your documents and proceed to the next step.

If you are certain that you agree to share your information and documents, simply click on "Yes, I'm sure".

Set up a PIN for faster login access.

After sharing your documents with the onboarding company, you can easily access and view them, along with the details of the recipients, by going to the "My Documents" section and selecting "All".

See how to Accept a Connection Request in a 2-minute video
If you have any questions about this process please email our support team at support@valid8me.com
