Here is a detailed guide on how to accept a connection request from an Onboarding Company as a Corporate Client on the valid8Me mobile app.
If you don't already have the valid8Me App, you have the option to download it from the App Store or Google Play Store. Alternatively, you can access the valid8Me Web App at login.valid8me.com and proceed to the Customer Portal.
If an Onboarding Company sends you a connection request, you will receive an email containing links to both the mobile and web apps. You can find an example of this email here.

If you already have the valid8Me mobile app installed, you will also receive a notification within the app. Once you have selected and installed the suitable app for your phone, you can easily log in or create a new account by clicking on the "Sign Up" link located at the bottom of the screen.

Please read and accept the end user terms and conditions if you're happy to accept them.

Provide your email address and create a secure password.

To verify your email address, simply enter the code that was sent to the email address you provided in the previous step.

You will receive a confirmation notification once your account has been successfully created.

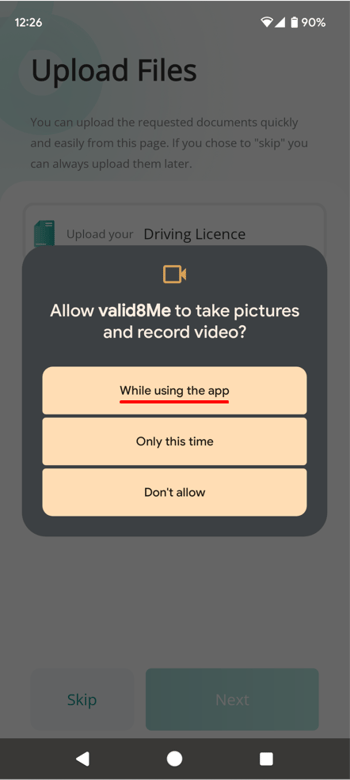
To enable valid8Me to capture pictures and record videos, please grant the permission to access your camera and video recording while using the app. Granting permission to access your camera and video recording is necessary for performing the liveness detection test and capturing your profile photo.

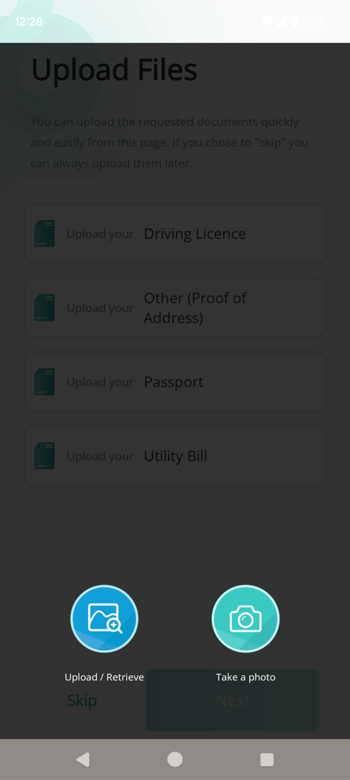
To submit the required Proof of ID and Address, you have the option to either choose documents that you have saved previously or take a photo of them using the app.

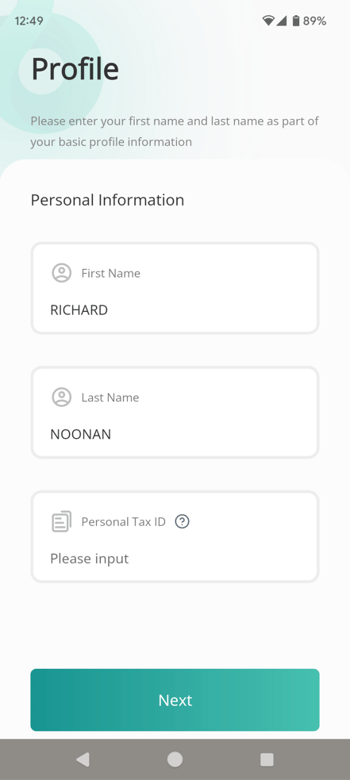
Provide your full name and tax identification number (Tax ID).

Once you have confirmed your email address, the next step is to create your profile:

During the setup process, you will be prompted to enter your "Trading Name" and "Legal Name".

After entering your "Trading Name" and "Legal Name", you will be able to move forward with uploading the required documents.

Please note the following important notice:

"This action requires you to have documents for 1 Authorised Representative. If you have the requested document to hand you can select the Upload button and create a local Authorised Representative's vault.
If you need to receive this document from the Authorised Representative, navigate to the Profile page and invite the Authorised Representative to join valid8Me."
If you don't have the document readily available and need to receive it from the Authorised Representative, you can navigate to the Profile page and invite the Authorised Representative to join valid8Me by tapping on the back button.

Then tap the Profile icon:

To add an Authorized Representative, simply tap on the plus symbol located to the right of the Authorized Representative section.

Then, enter the email address of the Authorized Representative.

The invited Authorised Representative will receive an invitation and will also be provided with three options to begin their onboarding process:

The Authorised Representative will be required to undergo a liveness detection test and take a profile photo using the valid8Me app. Additionally, depending on the specific requirements, they will need to upload a Photo ID and verify their phone number by entering a code sent to their mobile number.
For more information on the next steps for an invited Authorised Representative, please refer to the article titled "You have received an invite from a company to be an Authorised Representative."
Next, let's explore the scenario where you have the necessary document readily available. If you tap on the "Pending" status for the document you wish to upload, you will have the option to either "Upload/Retrieve" the document from your files or "Take a photo."

You will see Completed and Pending next to the requested documents.
Please keep in mind that when we say "Completed," it means that the documents have already been uploaded to valid8Me. On the other hand, "Pending" means that the documents still need to be uploaded to your valid8Me account so that you can share them with the Onboarding Company.
To upload documents, select the Pending icon.
You will have the choice to either "Upload/Retrieve" the document from your files or "Take a photo".

Once you have retrieved or taken a photo of the document, a preview will be available and you can easily upload it to the platform.

You will receive a confirmation once the document has been successfully uploaded.

Once you have successfully uploaded the Certificate of Incorporation, you will be guided to provide the Company Details and upload your Company Logo.

Fill in the necessary information about your company on this screen and upload your company logo on the next screen.

Select the Authorized Representative once they have given their consent to act as an Authorized Representative.

After selecting the Authorized Representative, a request will be sent to them to provide the required documents.

Now we can see that the only document outstanding is the Authorised Representative's Proof of Address

Once you click Consent, a message will appear to ensure that you wish to share your documents with the onboarding company.
Click Yes, I'm sure to share your documents with the onboarding company.

After sharing your documents with the onboarding company, you can easily access and view the shared documents in the "My Documents" section. This allows you to keep track of whom you have shared the documents with and review them whenever needed.

If you have any questions about this process please email our support team at support@valid8me.com
